[phpBB Debug] PHP Warning: in file [ROOT]/includes/bbcode.php on line 488: preg_replace(): The /e modifier is no longer supported, use preg_replace_callback instead
[phpBB Debug] PHP Warning: in file [ROOT]/includes/bbcode.php on line 488: preg_replace(): The /e modifier is no longer supported, use preg_replace_callback instead
[phpBB Debug] PHP Warning: in file [ROOT]/includes/bbcode.php on line 488: preg_replace(): The /e modifier is no longer supported, use preg_replace_callback instead
[phpBB Debug] PHP Warning: in file [ROOT]/includes/bbcode.php on line 488: preg_replace(): The /e modifier is no longer supported, use preg_replace_callback instead
[phpBB Debug] PHP Warning: in file [ROOT]/includes/bbcode.php on line 488: preg_replace(): The /e modifier is no longer supported, use preg_replace_callback instead
[phpBB Debug] PHP Warning: in file [ROOT]/includes/bbcode.php on line 488: preg_replace(): The /e modifier is no longer supported, use preg_replace_callback instead
[phpBB Debug] PHP Warning: in file [ROOT]/includes/bbcode.php on line 488: preg_replace(): The /e modifier is no longer supported, use preg_replace_callback instead
[phpBB Debug] PHP Warning: in file [ROOT]/includes/bbcode.php on line 488: preg_replace(): The /e modifier is no longer supported, use preg_replace_callback instead
[phpBB Debug] PHP Warning: in file [ROOT]/includes/bbcode.php on line 488: preg_replace(): The /e modifier is no longer supported, use preg_replace_callback instead
[phpBB Debug] PHP Warning: in file [ROOT]/includes/bbcode.php on line 488: preg_replace(): The /e modifier is no longer supported, use preg_replace_callback instead
[phpBB Debug] PHP Warning: in file [ROOT]/includes/bbcode.php on line 488: preg_replace(): The /e modifier is no longer supported, use preg_replace_callback instead
[phpBB Debug] PHP Warning: in file [ROOT]/includes/bbcode.php on line 488: preg_replace(): The /e modifier is no longer supported, use preg_replace_callback instead
[phpBB Debug] PHP Warning: in file [ROOT]/includes/bbcode.php on line 488: preg_replace(): The /e modifier is no longer supported, use preg_replace_callback instead
[phpBB Debug] PHP Warning: in file [ROOT]/includes/bbcode.php on line 488: preg_replace(): The /e modifier is no longer supported, use preg_replace_callback instead
[phpBB Debug] PHP Warning: in file [ROOT]/includes/bbcode.php on line 488: preg_replace(): The /e modifier is no longer supported, use preg_replace_callback instead
[phpBB Debug] PHP Warning: in file [ROOT]/includes/bbcode.php on line 488: preg_replace(): The /e modifier is no longer supported, use preg_replace_callback instead
[phpBB Debug] PHP Warning: in file [ROOT]/includes/bbcode.php on line 488: preg_replace(): The /e modifier is no longer supported, use preg_replace_callback instead
[phpBB Debug] PHP Warning: in file [ROOT]/includes/bbcode.php on line 488: preg_replace(): The /e modifier is no longer supported, use preg_replace_callback instead
[phpBB Debug] PHP Warning: in file [ROOT]/includes/bbcode.php on line 488: preg_replace(): The /e modifier is no longer supported, use preg_replace_callback instead
[phpBB Debug] PHP Warning: in file [ROOT]/includes/bbcode.php on line 488: preg_replace(): The /e modifier is no longer supported, use preg_replace_callback instead
[phpBB Debug] PHP Warning: in file [ROOT]/includes/bbcode.php on line 488: preg_replace(): The /e modifier is no longer supported, use preg_replace_callback instead
[phpBB Debug] PHP Warning: in file [ROOT]/includes/bbcode.php on line 488: preg_replace(): The /e modifier is no longer supported, use preg_replace_callback instead
[phpBB Debug] PHP Warning: in file [ROOT]/includes/bbcode.php on line 488: preg_replace(): The /e modifier is no longer supported, use preg_replace_callback instead
[phpBB Debug] PHP Warning: in file [ROOT]/includes/bbcode.php on line 488: preg_replace(): The /e modifier is no longer supported, use preg_replace_callback instead
[phpBB Debug] PHP Warning: in file [ROOT]/includes/bbcode.php on line 488: preg_replace(): The /e modifier is no longer supported, use preg_replace_callback instead
[phpBB Debug] PHP Warning: in file [ROOT]/includes/bbcode.php on line 488: preg_replace(): The /e modifier is no longer supported, use preg_replace_callback instead
[phpBB Debug] PHP Warning: in file [ROOT]/includes/functions_content.php on line 696: preg_replace(): The /e modifier is no longer supported, use preg_replace_callback instead
[phpBB Debug] PHP Warning: in file [ROOT]/includes/functions_content.php on line 696: preg_replace(): The /e modifier is no longer supported, use preg_replace_callback instead
[phpBB Debug] PHP Warning: in file [ROOT]/includes/functions_content.php on line 696: preg_replace(): The /e modifier is no longer supported, use preg_replace_callback instead
[phpBB Debug] PHP Warning: in file [ROOT]/includes/functions.php on line 4767: Cannot modify header information - headers already sent by (output started at [ROOT]/includes/functions.php:3897)
[phpBB Debug] PHP Warning: in file [ROOT]/includes/functions.php on line 4769: Cannot modify header information - headers already sent by (output started at [ROOT]/includes/functions.php:3897)
[phpBB Debug] PHP Warning: in file [ROOT]/includes/functions.php on line 4770: Cannot modify header information - headers already sent by (output started at [ROOT]/includes/functions.php:3897)
[phpBB Debug] PHP Warning: in file [ROOT]/includes/functions.php on line 4771: Cannot modify header information - headers already sent by (output started at [ROOT]/includes/functions.php:3897)
Fiesta-Si.com • View topic - How to make: Camber Adjustable Lower Arms.
Index Page Find us on Facebook  Find us on twitter  Follow our RSS Feed
It is currently Thu Jun 19, 2025 12:14 am

All times are UTC [ DST ]


Post new topic Reply to topic  [ 3 posts ] 
Author Message
PostPosted: Wed Jun 13, 2012 8:14 pm 
Offline
FSI Supporter
FSI Supporter
User avatar

Joined: Fri May 23, 2008 12:40 am
Posts: 7094
Location: Portsmouth
Drives:
This is just a brief guide to making camber adjustable lower arms.

Your lower arms may vary in looks as I have the latter mk3.5/ka arms which are stronger than the twin skin ones you normally see.

I do not hold any responsibility for any deaths or crashed cars caused by copying this guide, because if you do it wrong, it's your own fault :)

It's not a full in depth guide, just a brief one as I didn't take pictues at every stage.

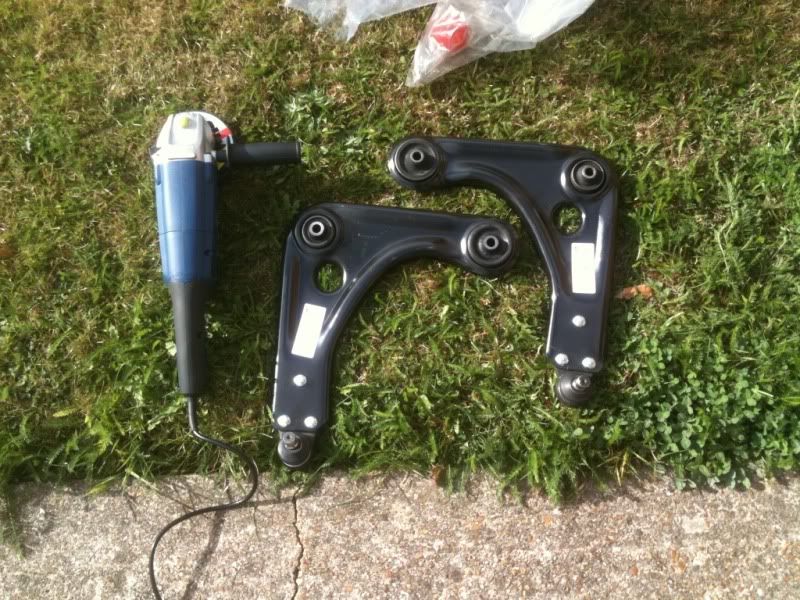
The main things will need:

- A pair of lower arms.
- Angle grinder.
- A round file, and perhaps a flat one.
- Fine tipped marker pen/pencil.
- A ruler. You can use a tape measure but it's not as good in my opinion.
- Sand paper to rub out any mistakes if you draw the lines in marker pen.
- Vice or G clamp.
- Energy drinks - not essential. Replace with whatever drinks you wish :)

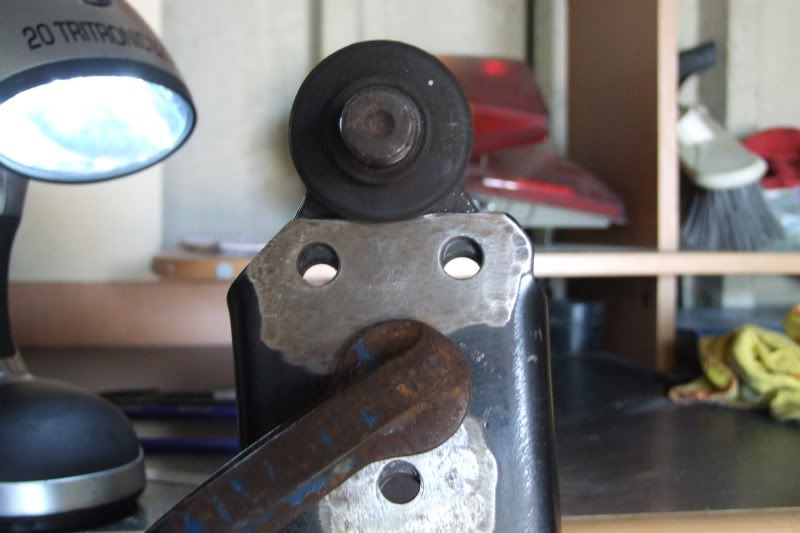
First things first, get your lower arms and angle grinder out. You will want to be grinding the heads of the rivets off.

Image

You will be left with something looking like this:

Image

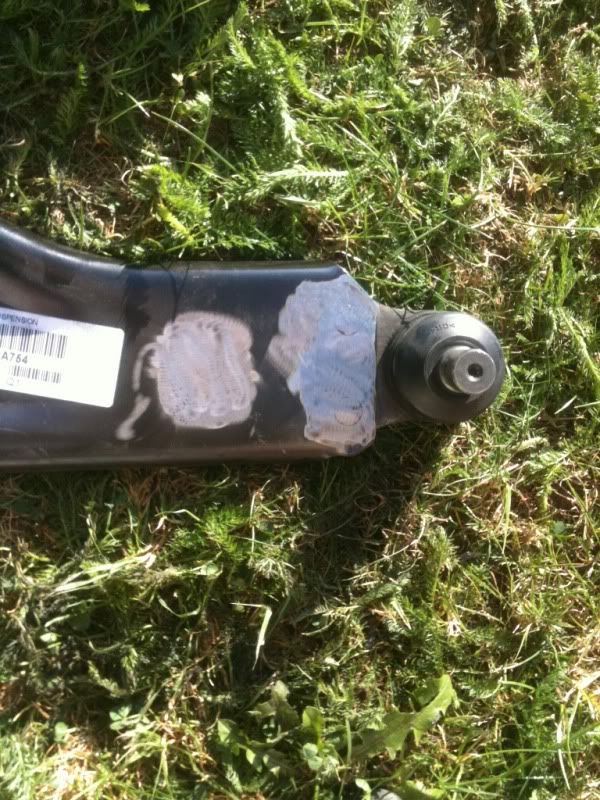
Then get a hammer or something, an tap out the ball joint.

Image

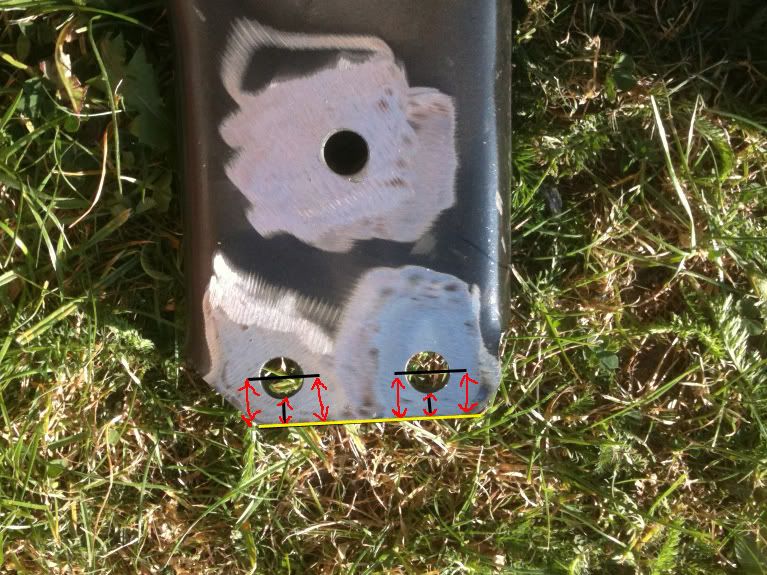
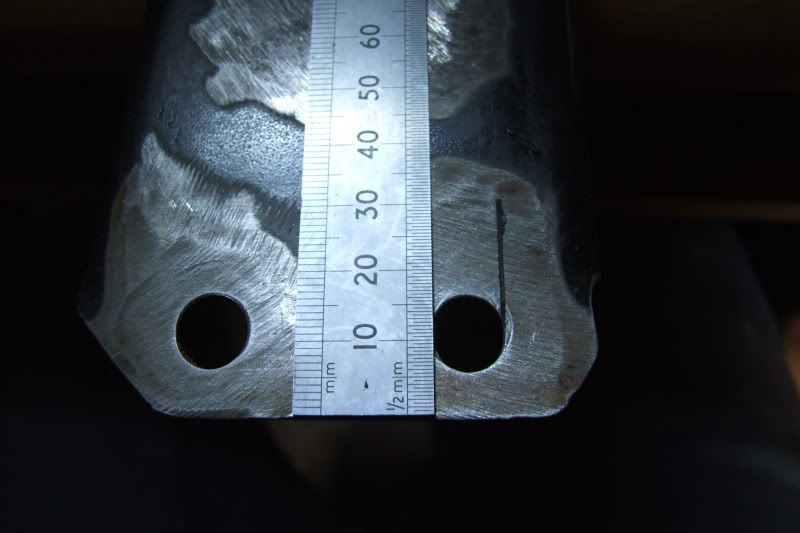
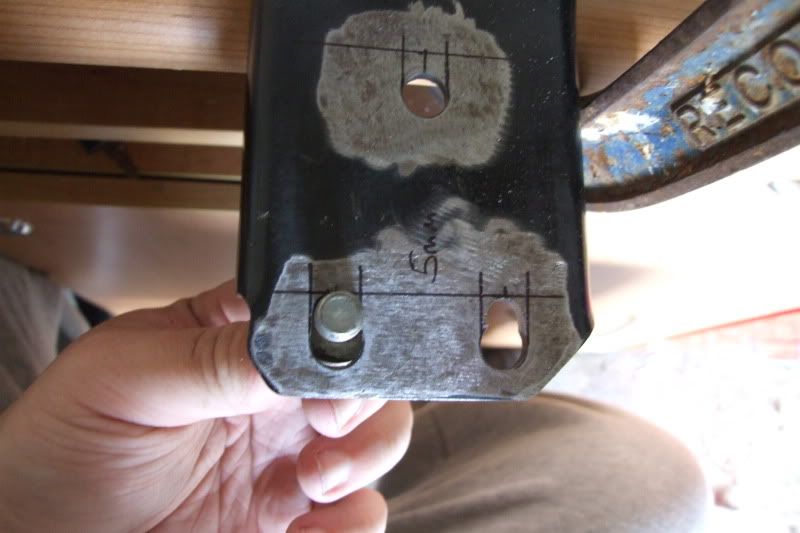
Then, you need to make some measurements, to be 100% sure the lower arms are perfectly shaped and the holes are in the right place. Not doing so could result in wonky lines drawn later, and holes which are offset.

The diagram below is for illustration purposes only. What you need to measure is from the YELLOW straight edge, to the centre of the hole on each side, on each hole.

So do your first one, then do the same on the next hole. All distances SHOULD be the same. If they are not, this means either the straight edge isn't truely straight. OR the holes might have been stamped/drilled at a slight angle possibly. I would think its rare for the holes to be in the wrong place though!!

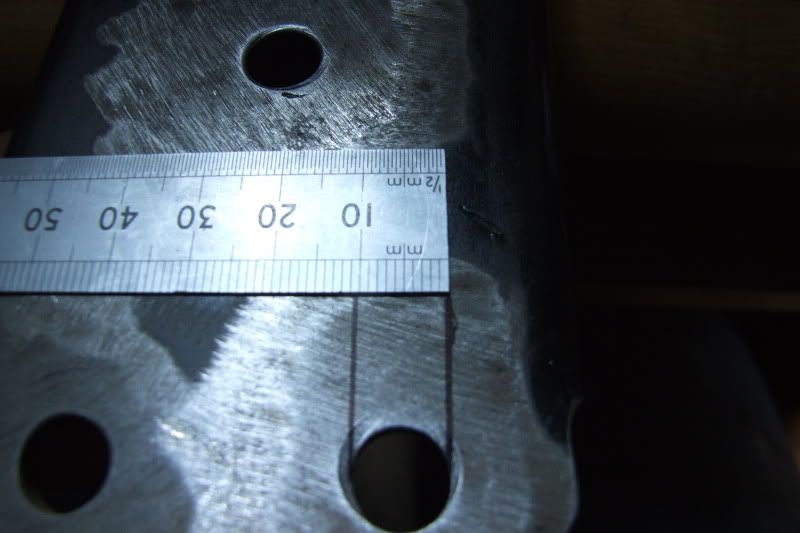
Then measure from the centre of the bottom of the hole, to the yellow line. Again, these distances should be the same. You don't need to do this, but it will rule out any mistakes you might have made measuring to the centre of the hole/confirm the edge isn't straight.

If the distances are different, you'll probably want to make them all the same by filing down the straight edge until those distances are the same. The reason you want it all to be perfect and even is because you will end up with wonky lines when you draw them later and then probably have wonky holes.

Does that make sense? I hope so. I know what I mean :lol:

Image

Right, then you need to get the rivets out the ball joint. I used a hammer and an old bar which is my beating bar, placed the ball joint on a surface with a hole and whacked them out.

Image

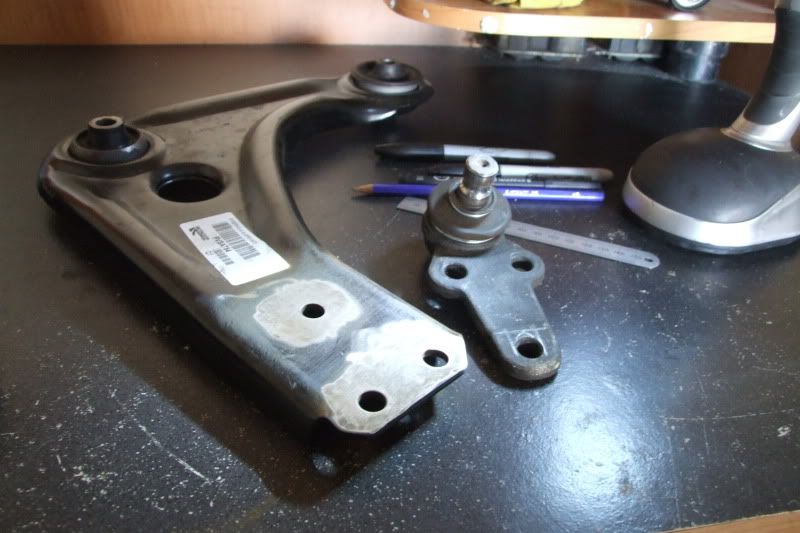
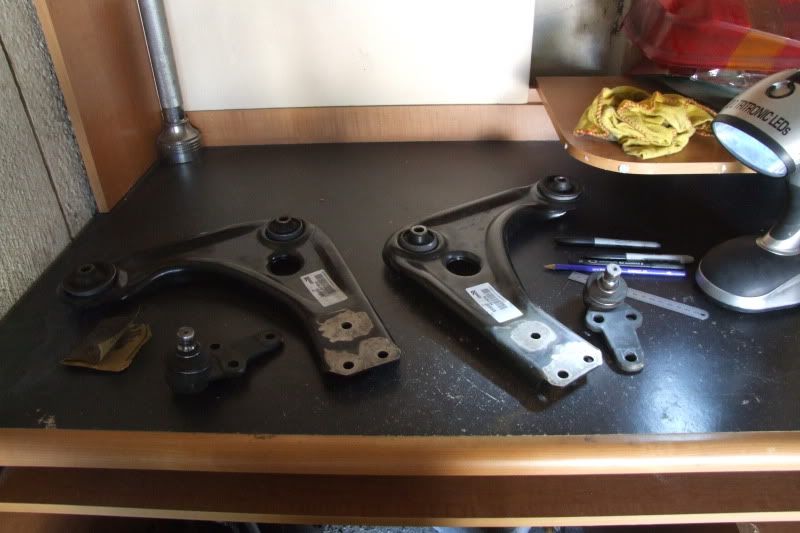
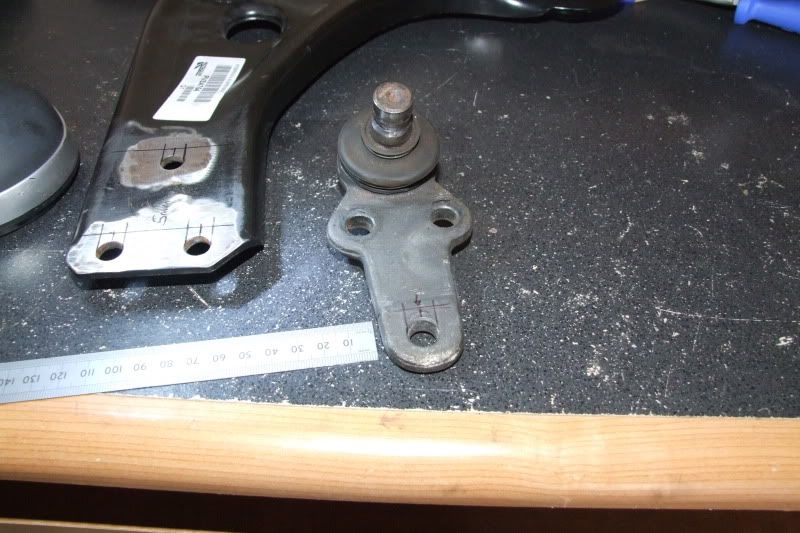
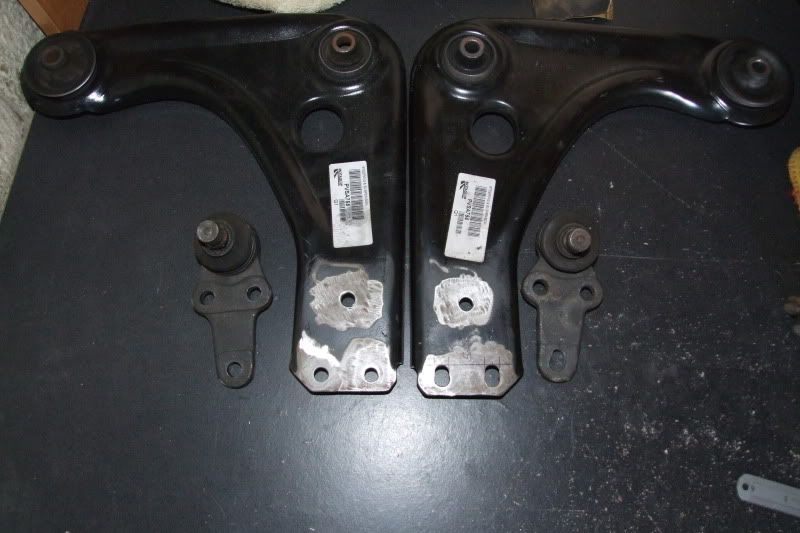
Then you are left with two lower arms and ball joints ready to go!

Image

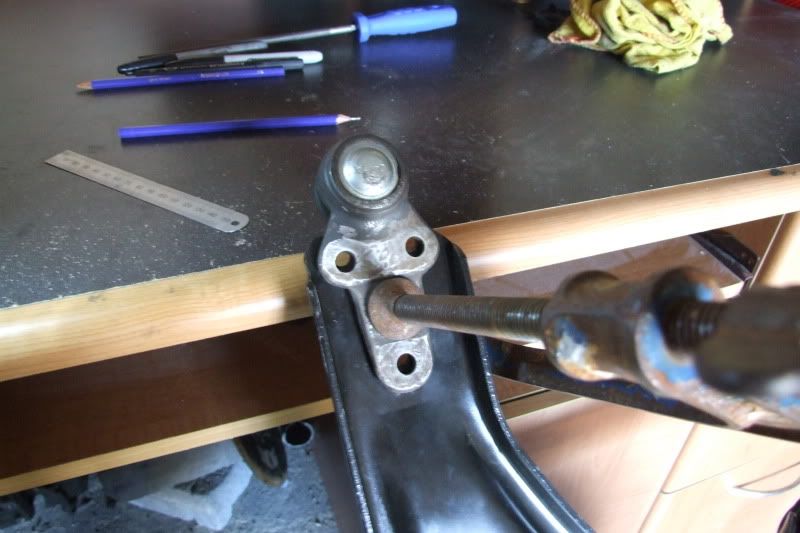
Now, on this part, you don't need to clamp the ball joint in place, but I did because I couldn't hold the camera, pencil and lower arm + ball joint all at once.

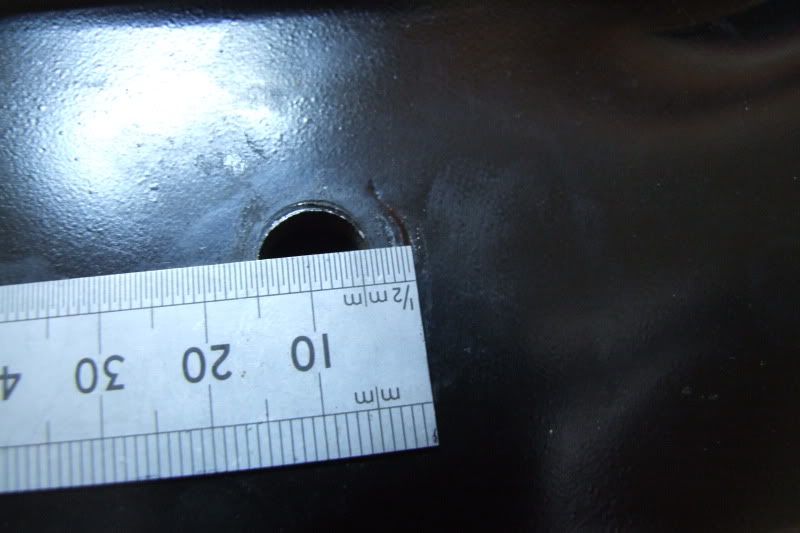
You want to place the ball joint where it would normally be, then slide it down until it stops. Then use a pencil or pen to mark the inside of the hole on the lower arm and ball joint.

Image
Image
Image
Image
Image
Image
Image

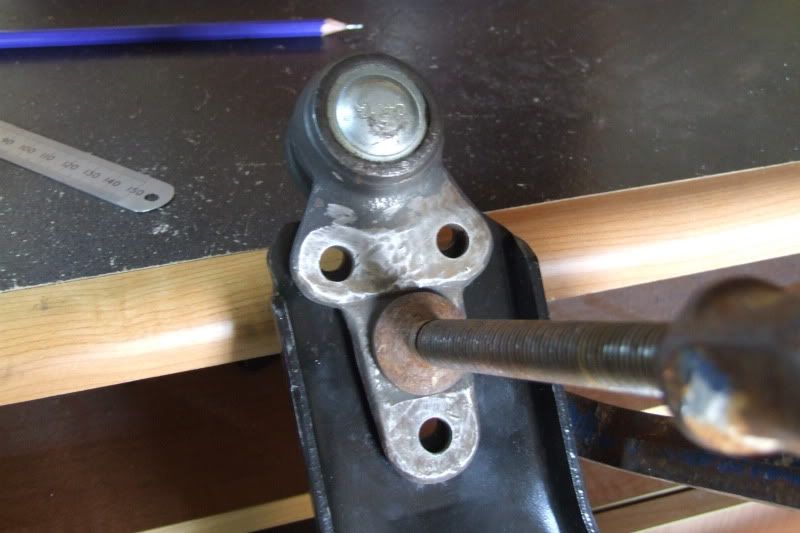
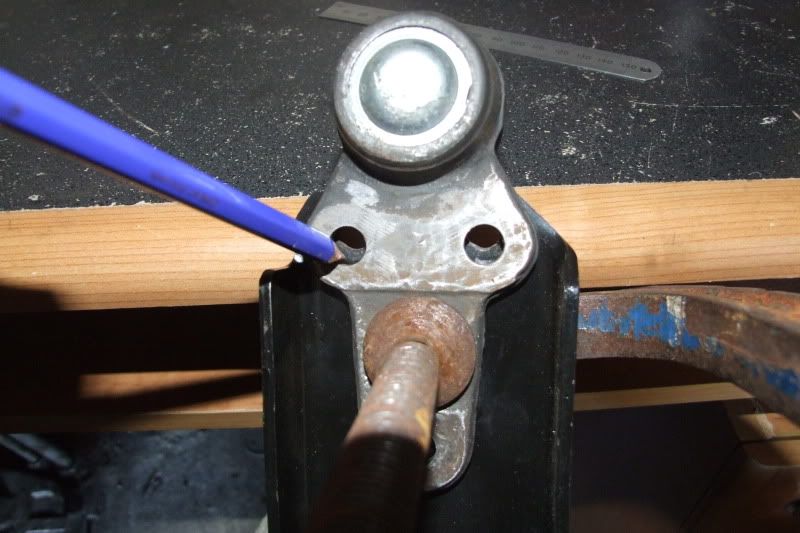
Then measure the marking. Mine was 4mm. I filed the holes to 5mm though, just to give myself that tiny bit extra just in case.

Image

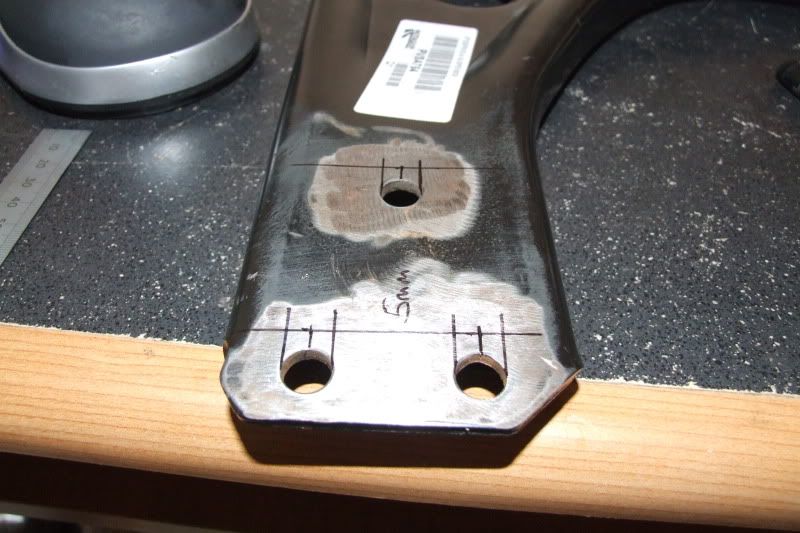
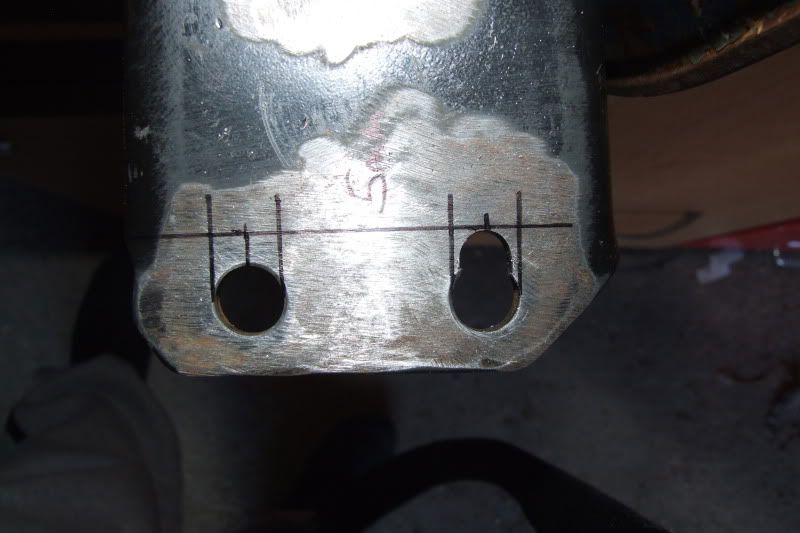
This is where the straight edge comes into play... Get your ruler, make sure it's parallel to the edge, then start drawing your lines.

Image

Then measure at the top and at the bottom of the lines to make sure the distances are the same. If they are, good job. If they aren't. Do it again! :) Then do the other side.

Image

Then measure 5mm from the top of the hole (or however many mm's your distance is) on each hole, then draw a straight line across both marks.

At this point you can be anal if you want and measure from the line you just drew to the edge, it should all be the same distance :)

Also it's worth noting, you might want to put a line down the middle as a filing guide line. And also, I got a bit pen happy and made some lines on the rear hole. DONT DO THAT! You will not be filing that hole. Well, you can if you want to, but I am not, and other professional lower arms sets have the two front holes filed and the rear ball joint hole filed, like what I will be doing. So ignore them marks :D

Image

Then mark 5mm on the single hole of the ball joint, draw up your lines... then it's time to start filing!

Image

Clamp your lower arm into your vice or onto the work bench..../computer workstation in your garage if you have one :lol:

Image

Then file up the guide line until you get to the 5mm mark.

Image

Then you can either enlarge that hole or do the next side like I did, for whatever reason.

Image

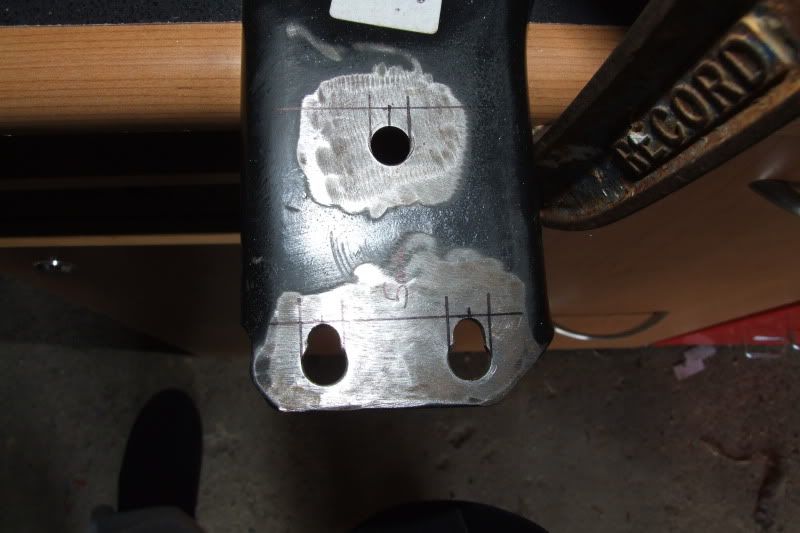
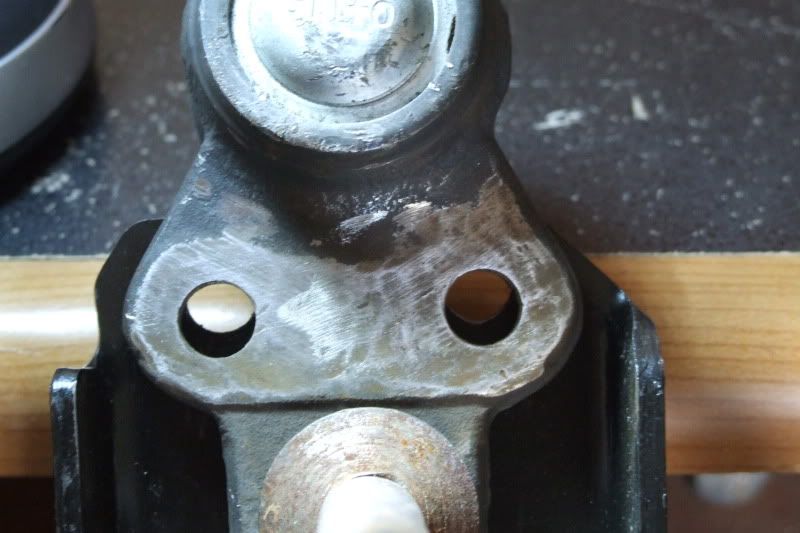
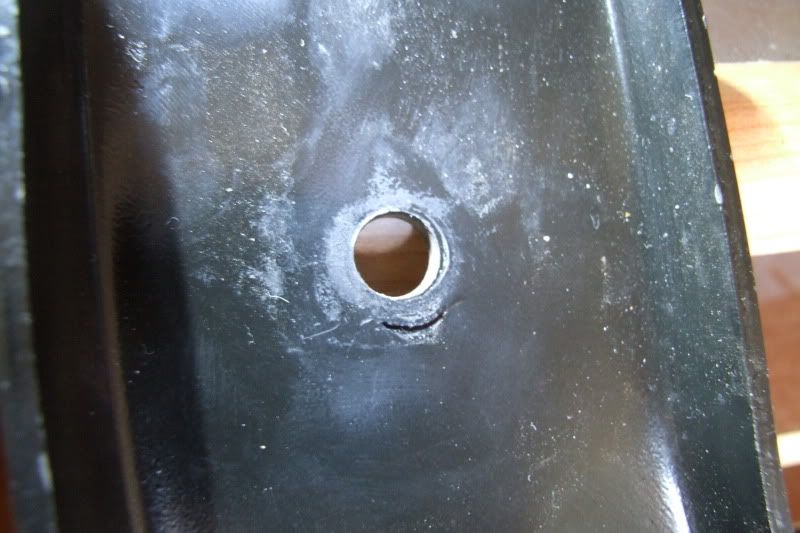
Then start enlarging the holes. Please note that these holes aren't perfect yet as I will do all that later.

Image
Image
Image

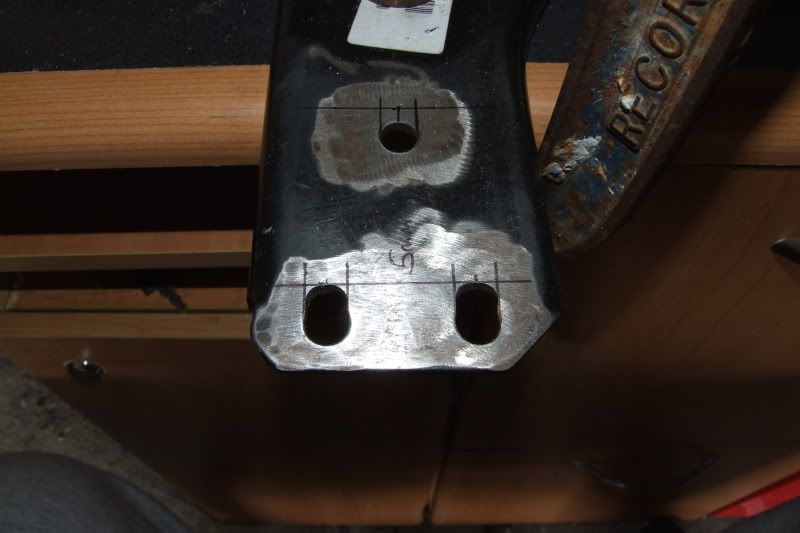
Then do the ball joint hole. Again, not 100% perfect yet. Will do that later. In fact, in this picture it wasn't even big enough for the bolt to slide down the hole, I enlarged it though, don't worry :lol:

Image

I then got some old M10 bolts (with no nuts as I didn't have any), placed them in the holes and made sure it all worked. (Video below)


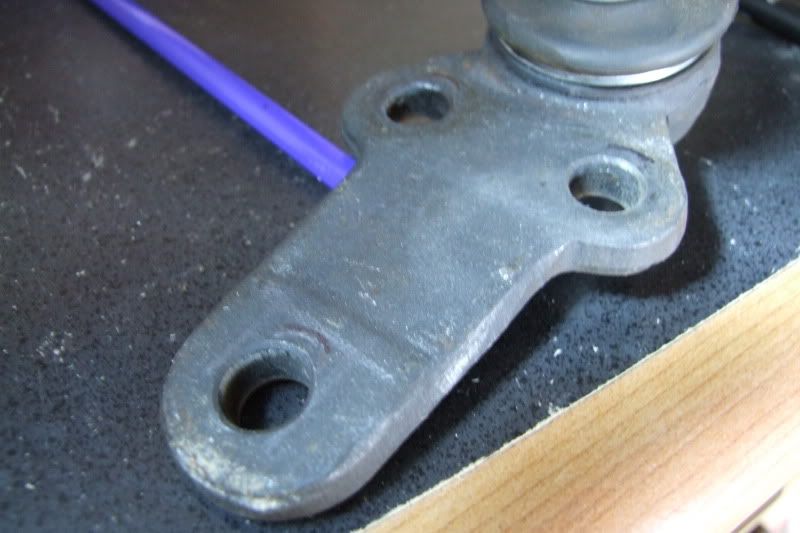
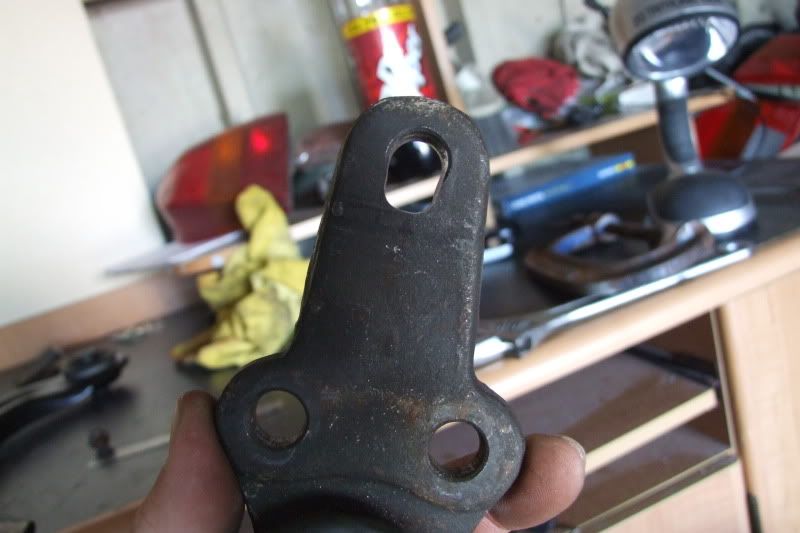
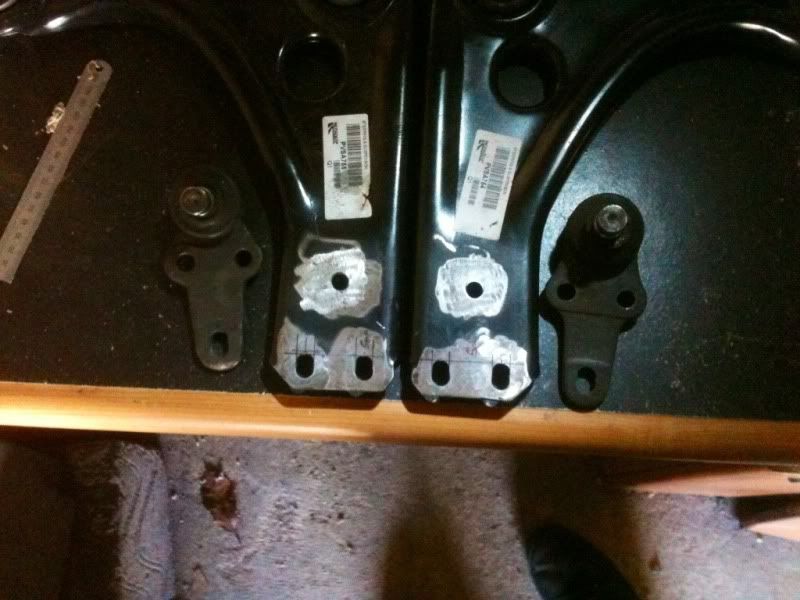
Comparison of before and after.

Image

Then at this point, some cats showed up!

Image

This one was spying on me!
Image

Then he went hunting!
Image

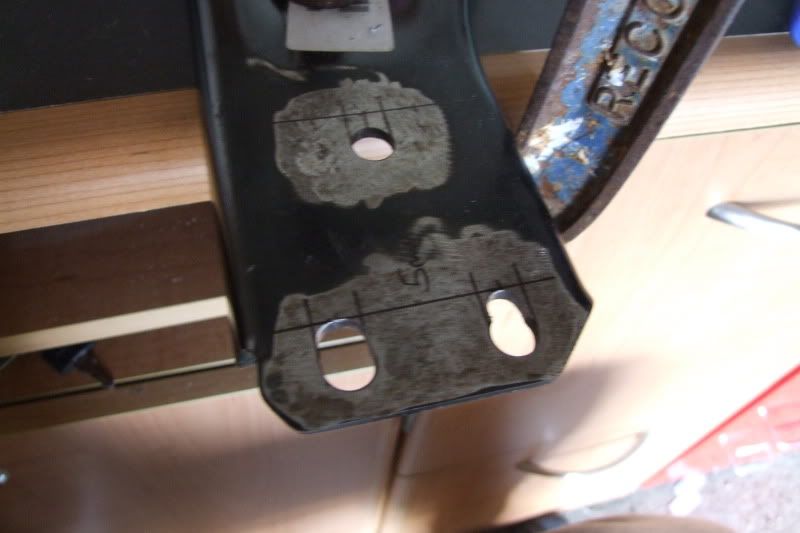
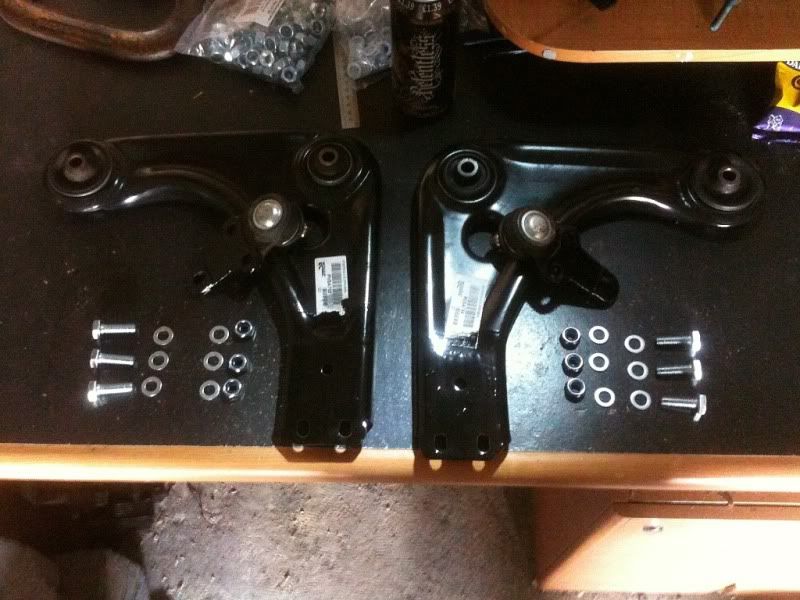
ANYWAY! Do the same with the other lower arm, and you have yourself a pair. Note, after this picture was taken, I made all my final adjustments to the holes, made sure they was all even and had nice flat edges ect.

Image

At this point, you will need to paint them. Hammerite black paint will do. You can use any paint you like though.

You'll need some new nuts, bolts and washers too. I popped down to screwfix and got myself a load of M10 set scews which was 30mm long (you can use 25mm minimum I think), some nylock nuts and some washers.

Then once the paint as dried, assemble them and pop them on the car.

Please note, you MUST get your car tracking and camber laser aligned after you have done this. I know some places allow you to have it done, then you have a certain time to take if back if it's not right and they will check it and adjust it for free. You can take advantage of this by having your car tracked up on the normal lower arms, taking it home, swapping the lower arms over and then take it back to get it re-tracked and also see how many degrees of camber you have shaved off - also making sure both sides are even of course.

If you need even more camber adjustment, you can take off some of the front edge of the lower arm (where the yellow line is on the diagram above) then increase the length of the holes more. Depending how much you take off will give you anywhere between 5-10mm. But do not take off so much of the edge that you are really close to the holes. I would leave roughly 2-3mm minimum. All for a safety point of view.

I hope this guide might be of some use to some people out there! :)

_________________


Image
Image


Top
 Profile  
Reply with quote  
PostPosted: Thu Jun 14, 2012 2:51 pm 
Offline
FSI Supporter
FSI Supporter
User avatar

Joined: Fri May 23, 2008 12:40 am
Posts: 7094
Location: Portsmouth
Drives:
I let the paint dry on these over night and popped to screwfix to get some new nylock nuts, washers and 30mm set screws which give about 5mm of thread poking through I think - from my calculations. You can probably get away with 25mm set screws, but you need to make sure you have at least 2-3 threads past the nylock insert in the nut for safety purposes.

Just a quick picture.

Image[/quote]

_________________


Image
Image


Top
 Profile  
Reply with quote  
PostPosted: Thu Jun 14, 2012 10:34 pm 
Offline
Jap Crew
Jap Crew

Joined: Tue Dec 21, 2004 6:24 pm
Posts: 11189
Location: In the Shires
Drives:
Sweet idea dude :) I like it.

_________________
Rest in peace Ben "Jam" Elvin. Gone but never forgotten.


Top
 Profile  
Reply with quote  
Display posts from previous:  Sort by  
Post new topic Reply to topic  [ 3 posts ] 

All times are UTC [ DST ]


Who is online

Users browsing this forum: No registered users and 4 guests


You cannot post new topics in this forum
You cannot reply to topics in this forum
You cannot edit your posts in this forum
You cannot delete your posts in this forum
You cannot post attachments in this forum

Search for:
Jump to: